In this () tutorial, we are going to visualize successive transformations of an object using VTK.
More examples and tutorials can be found here
To begin with, we need to import all the necessary Python functions and external libraries:
Successive Transforms
We previously discussed how to apply successive transformations to an object. Here, we are going visualize this process.
Homogeneous transformation is presented in VTK using vtkTransform
Python Setup
We will focus on using
from vtkmodules.vtkCommonTransforms import vtkTransformto describe the full range of linear coordinate transformations, including rotation and translation, in 3D, internally represented as a homogeneous transformation matrix.
Most of the methods for manipulating this transformation, e.g. Translate, Rotate, and Concatenate, can operate in either PreMultiply (the default) or PostMultiply mode. In PreMultiply mode, the translation, concatenation, etc. will occur before any transformations which are represented by the current matrix. In PostMultiply mode, the additional transformation will occur after any transformations represented by the current matrix.
The presentation we use adheres to the PostMultiply mode.
import math
import numpy as np

# noinspection PyUnresolvedReferences
import vtkmodules.vtkInteractionStyle
# noinspection PyUnresolvedReferences
import vtkmodules.vtkRenderingOpenGL2
from vtkmodules.vtkCommonColor import vtkNamedColors
from vtkmodules.vtkCommonTransforms import vtkTransform
from vtkmodules.vtkFiltersSources import vtkSphereSource
from vtkmodules.vtkRenderingAnnotation import vtkAxesActor
from vtkmodules.vtkRenderingCore import (
    vtkActor,
    vtkPolyDataMapper,
    vtkRenderWindow,
    vtkRenderWindowInteractor,
    vtkRenderer
)
Rendering
# Visualization Pipeline

# a renderer and render window
ren = vtkRenderer()
renWin = vtkRenderWindow()
renWin.SetWindowName('AISE 4025: Transformations')
renWin.SetSize( 640, 480 )
renWin.AddRenderer( ren )

# an interactor
iren = vtkRenderWindowInteractor()
iren.SetRenderWindow( renWin )
Geometry
Instead of visualizing rotation of a point, we will rotate an orthonormal axes instead.
colors = vtkNamedColors()

# add an 3D Axes
originalAxes = vtkAxesActor()
originalAxes.SetTotalLength(5, 5, 5)
originalAxes.AxisLabelsOff()

# properties of the axes labels can be set as follows
# this sets the x axis label to red
originalAxes.GetXAxisCaptionActor2D().GetCaptionTextProperty().SetColor(colors.GetColor3d('Red'));
originalAxes.GetYAxisCaptionActor2D().GetCaptionTextProperty().SetColor(colors.GetColor3d('Green'));
originalAxes.GetZAxisCaptionActor2D().GetCaptionTextProperty().SetColor(colors.GetColor3d('Blue'));
Specify the geometry of the translational vector
alpha = 60 # 60 degree
beta = 45
transform = vtkTransform()
transform.PostMultiply()
transform.Identity()
transform.RotateX( alpha )
transform.RotateY( beta )
transform.Translate( 1, 2, 3)

originalAxes.SetUserTransform( transform )
We can look inside of the transform, one see that the transformation is represented as a matrix, and the translational vector is the column.
print(transform)We can add a 3D axes to help us orient
# add an 3D Axes
axes = vtkAxesActor()
axes.SetTotalLength(10,10,10)
axes.AxisLabelsOff()

# properties of the axes labels can be set as follows
# this sets the x axis label to red
axes.GetXAxisCaptionActor2D().GetCaptionTextProperty().SetColor(colors.GetColor3d('Red'));
axes.GetYAxisCaptionActor2D().GetCaptionTextProperty().SetColor(colors.GetColor3d('Green'));
axes.GetZAxisCaptionActor2D().GetCaptionTextProperty().SetColor(colors.GetColor3d('Blue'));
Add all actors to the renderer so the renderer knows what to draw.
# Add the actors to the scene
ren.AddActor( originalAxes )
ren.AddActor( axes )
ren.SetBackground( colors.GetColor3d( 'MidnightBlue') ) # the color can be specified as a name
ren.SetBackground( .1, .2, .4 )                         # or as RGB
ren.SetBackground( 1, 1, 1 )                            # this is white
ren.ResetCamera()
Draw onto the render window and start the user interaction.
renWin.Render()
iren.Start()
A window will pop up:
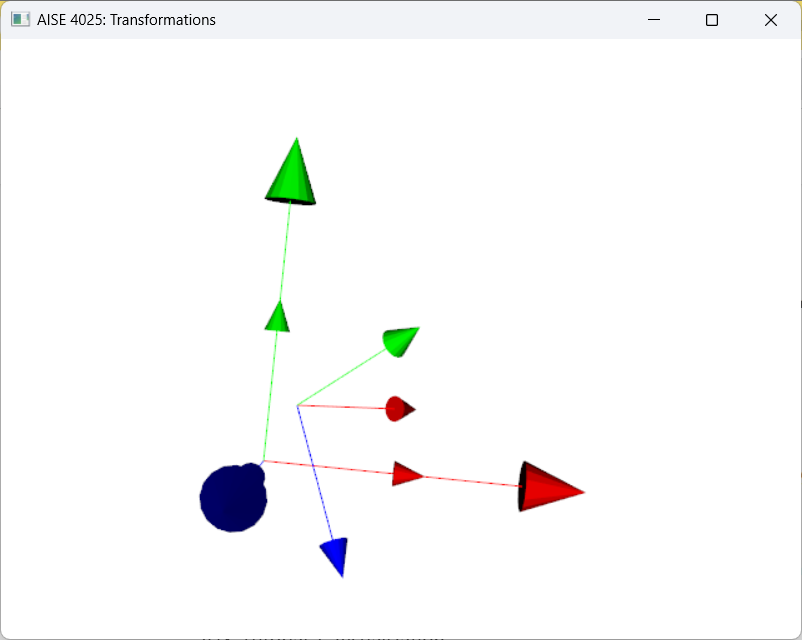
Figure 1:Orthogonal axes (shorter one) being transforms by successive rotations and translation.
Use the mouse to change the viewing angle!
Press ‘q’ to exit