In this () tutorial, we are going to visualize the translation of an object using VTK.
More examples and tutorials can be found here
To begin with, we need to import all the necessary Python functions and external libraries:
Translation
We previously discussed how to transform an object by translation. Here, we are going visualize this process.
import math
import numpy as np

# noinspection PyUnresolvedReferences
import vtkmodules.vtkInteractionStyle
# noinspection PyUnresolvedReferences
import vtkmodules.vtkRenderingOpenGL2
from vtkmodules.vtkCommonColor import vtkNamedColors
from vtkmodules.vtkCommonTransforms import vtkTransform
from vtkmodules.vtkFiltersSources import vtkSphereSource
from vtkmodules.vtkRenderingAnnotation import vtkAxesActor
from vtkmodules.vtkRenderingCore import (
    vtkActor,
    vtkPolyDataMapper,
    vtkRenderWindow,
    vtkRenderWindowInteractor,
    vtkRenderer
)
Rendering
# Visualization Pipeline

# a renderer and render window
ren = vtkRenderer()
renWin = vtkRenderWindow()
renWin.SetWindowName('AISE 4025: translation')
renWin.SetSize( 640, 480 )
renWin.AddRenderer( ren )

# an interactor
iren = vtkRenderWindowInteractor()
iren.SetRenderWindow( renWin )
Geometry
A point with a position will be specified. However, as a point has no mass nor size, we will visualize it as a sphere.
colors = vtkNamedColors()

# Create a sphere to represent a point
point = np.array([0, 5, 0])         # position of a point

# use a sphere with a finite size to visualiza a point, since a point, by definition, has no size
sphereSource = vtkSphereSource()
sphereSource.SetCenter( point.tolist() )
sphereSource.SetRadius( 0.5 )       # an arbitrary size

# create a mapper
sphereMapper = vtkPolyDataMapper()
sphereMapper.SetInputConnection( sphereSource.GetOutputPort() )

# create an actor
sphereActor = vtkActor()
sphereActor.SetMapper( sphereMapper )
sphereActor.GetProperty().SetColor( colors.GetColor3d('Red') )
Specify the geometry of the translational vector
translation_vector = np.array([1,2,3])

transform = vtkTransform()
transform.PostMultiply()
transform.Identity()
transform.Translate( translation_vector.tolist() )
In VTK, we can use vtkTransform to represent a Rigid transformation that includes translation.
In the following code, you will see that we do not need to crate another sphere/point from source, instead, we can just initiate another instance of vtkActor, which shares the geometry of the original, and translate it by assigning the transform to it.
That is, we show the translated point/sphere in green.
translatedSphereActor = vtkActor()
translatedSphereActor.SetMapper( sphereMapper )
translatedSphereActor.SetUserTransform( transform )
translatedSphereActor.GetProperty().SetColor( colors.GetColor3d( 'Green' ) )
We can look inside of the transform, one see that the transformation is represented as a matrix, and the translational vector is the column.
print(transform)We can add a 3D axes to help us orient
# add an 3D Axes
axes = vtkAxesActor()
axes.SetTotalLength(10,10,10)
axes.AxisLabelsOff()

# properties of the axes labels can be set as follows
# this sets the x axis label to red
axes.GetXAxisCaptionActor2D().GetCaptionTextProperty().SetColor(colors.GetColor3d('Red'));
axes.GetYAxisCaptionActor2D().GetCaptionTextProperty().SetColor(colors.GetColor3d('Green'));
axes.GetZAxisCaptionActor2D().GetCaptionTextProperty().SetColor(colors.GetColor3d('Blue'));
Add all actors to the renderer so the renderer knows what to draw.
# Add the actors to the scene
ren.AddActor( sphereActor )
ren.AddActor( translatedSphereActor )
ren.AddActor( axes )
ren.SetBackground( colors.GetColor3d( 'MidnightBlue') ) # the color can be specified as a name
ren.SetBackground( .1, .2, .4 )                         # or as RGB
ren.SetBackground( 1, 1, 1 )                            # this is white
ren.ResetCamera()
Draw onto the render window and start the user interaction.
renWin.Render()
iren.Start()
A window will pop up:
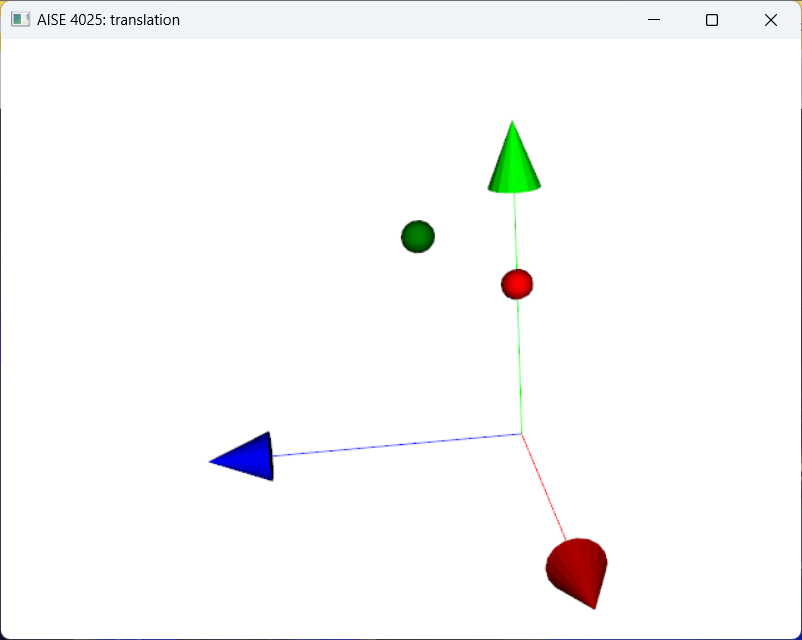
Figure 1:A red sphere being translated to a new position shown in green.
Use the mouse to change the viewing angle!
Press ‘q’ to exit